13 Easy Halloween Snacks & Treats Everyone Will Love (Fun Recipes for Kids & Parties)
Halloween is the perfect time to turn everyday snacks into fun, spooky treats! Whether you’re planning a Halloween party, packing festive school lunches, or hosting a family movie night, these easy recipes are guaranteed to be a hit.
From adorable ghost pops and mummy hot dogs to pumpkin-inspired appetizers and sweet Halloween desserts, you’ll find 13 simple recipes that are fun to make, kid-friendly, and perfect for celebrating the season.
Before you dive into the recipes… If you’re looking for Halloween kitchen tools, cookie cutters, candy eyes, piping bags, baking supplies, or party essentials, I’ve rounded up my favorite finds in one convenient guide. 👉Click here to browse my Halloween Essentials List
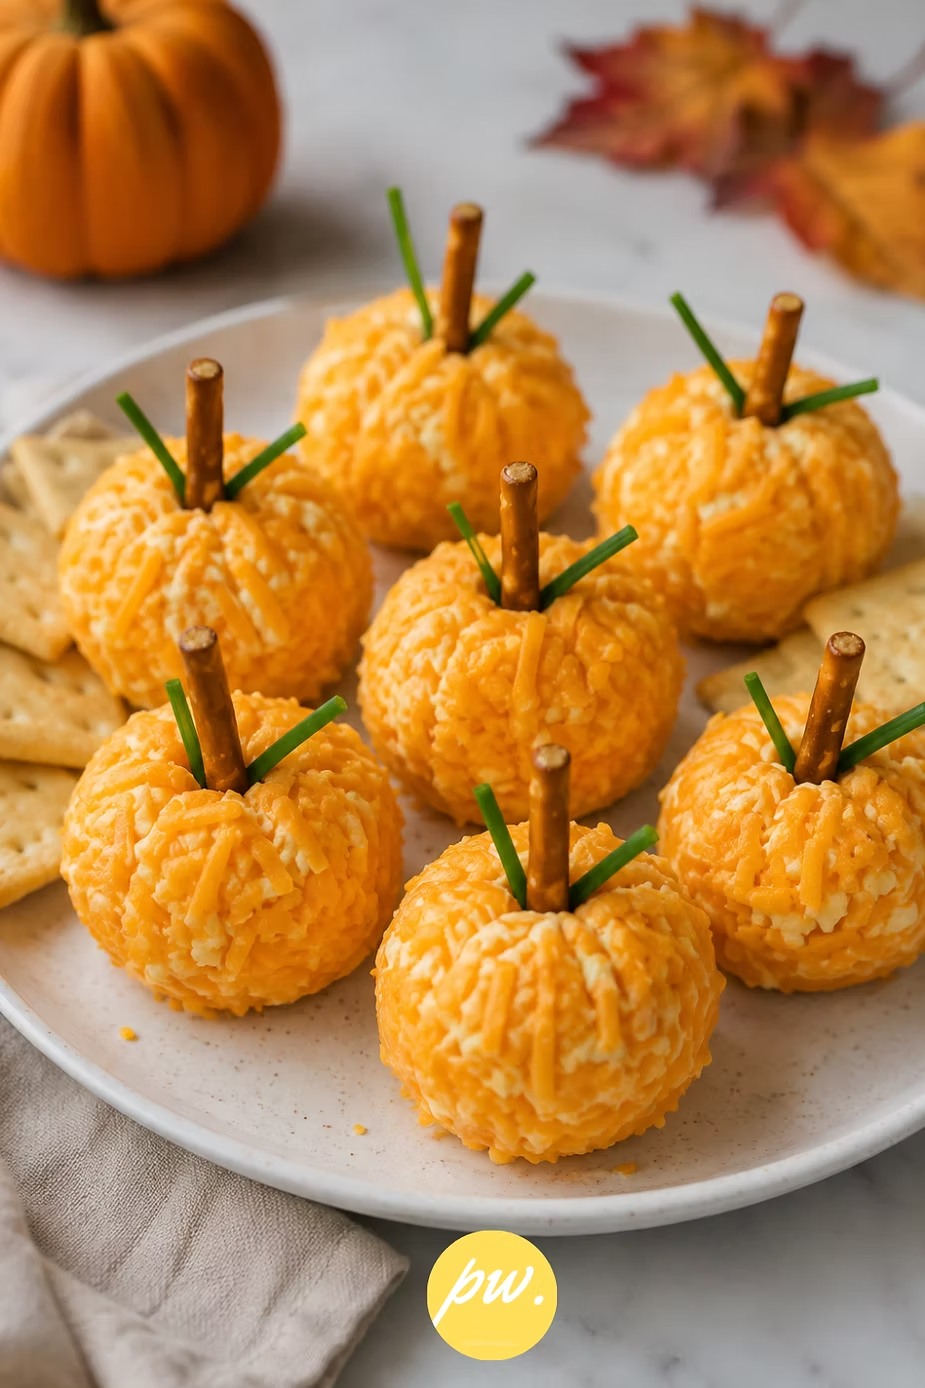
1.Easy Pumpkin Cheese Bites
These adorable pumpkin cheese bites are one of the easiest Halloween snacks you’ll make. Using store-bought cheese rounds and a few simple ingredients, they’re perfect for Halloween parties, school lunch boxes, or festive snack boards.
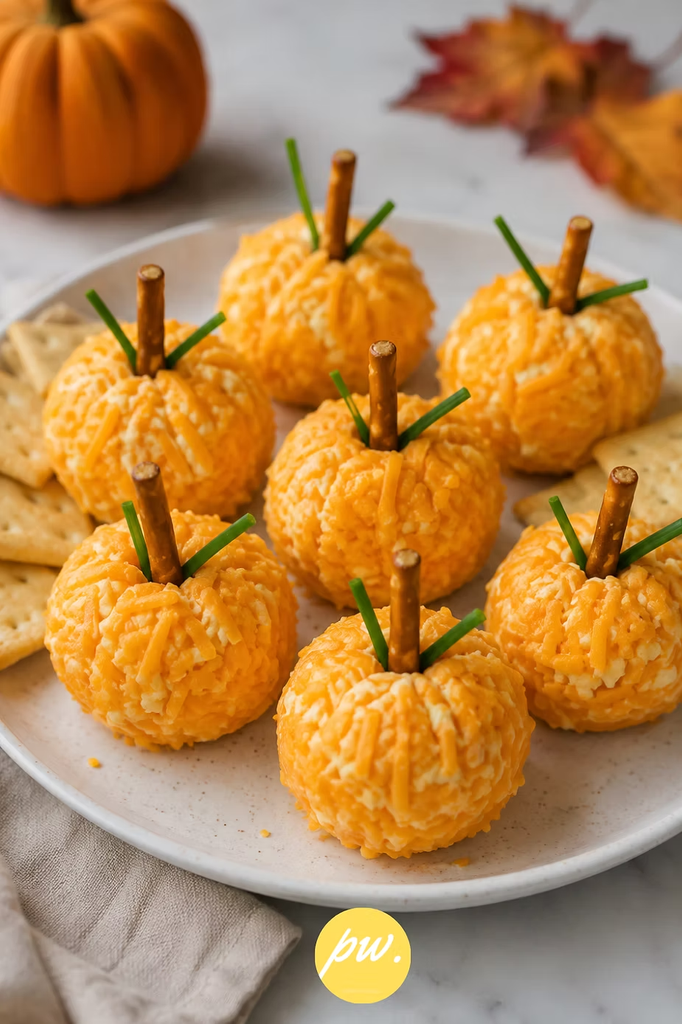
Ingredients
- 12 Mini Babybel Sharp Original Cheese Rounds (orange cheddar)
- 1 cup finely grated sharp cheddar cheese
- 12 pretzel sticks, broken into 1-inch pieces
- Fresh chives , cut into small pieces
Directions
- Remove the wax from each Mini Babybel cheese round.
- Gently roll each cheese round between your palms until smooth and round (Let the cheese sit at room temperature for a few minutes before rolling if it feels too firm).
- Spread the finely grated cheddar cheese onto a shallow plate.
- Roll each cheese ball in the grated cheddar until completely coated.
- Insert one small pretzel stick into the top of each cheese ball to create the pumpkin stem.
- Tuck a small piece of fresh chive or parsley beside the pretzel to resemble a pumpkin vine.
- Arrange the pumpkin cheese bites on a serving board with crackers, pretzels, apple slices, celery sticks, or grapes.
2.Ghost Banana Pops
These adorable Halloween Ghost Banana Pops are a fun, kid-friendly treat made with bananas, white chocolate, and candy eyes. They’re perfect for Halloween parties, classroom celebrations, or spooky lunchbox surprises.
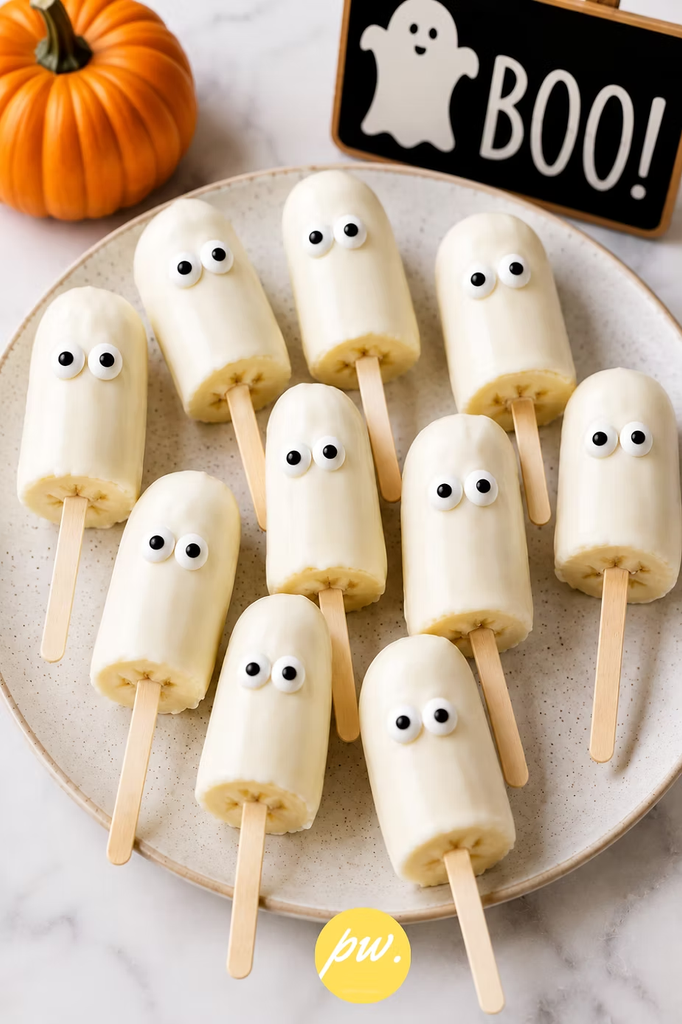
Ingredients
- 3 ripe bananas
- 12 oz white candy melts or white chocolate
- 12 lollipop sticks orwooden popsicle sticks
- 24 edible candy eyes
💡 Helpful Kitchen Tool
A silicone baking mat or parchment paper keeps the banana pops from sticking while the chocolate sets. A silicone cup comes in handy for melting chocolate and dipping treats with ease.
Directions
- Peel the bananas and cut each one in half.
- Insert a popsicle stick into the cut end of each banana half.
- Place the bananas on a parchment-lined baking sheet and freeze until firm.
- Melt the white candy melts or white chocolate according to the package directions.
- Dip each frozen banana into the melted white chocolate, coating it completely.
- Let the excess chocolate drip off before placing the banana back onto the parchment paper.
- Press two candy eyes onto each ghost while the chocolate is still soft.
- Allow the chocolate coating to set completely before serving.
Optional Variations
- Spooky Mummies: Drizzle extra white chocolate over the ghosts for a wrapped mummy look.
- Chocolate Ghosts: Use milk or dark chocolate instead of white chocolate.
- Healthy Version: Skip the candy eyes and use mini dark chocolate chips instead.
- Mini Ghost Bites: Slice bananas into thick rounds and insert short cocktail picks instead of popsicle sticks.
3.Easy Mummy Hot Dogs
These adorable Mummy Hot Dogs are a Halloween classic that kids absolutely love. Made with hot dogs, crescent roll dough, and candy-like edible eyes, they’re perfect for Halloween parties, spooky lunches, or an easy family dinner.
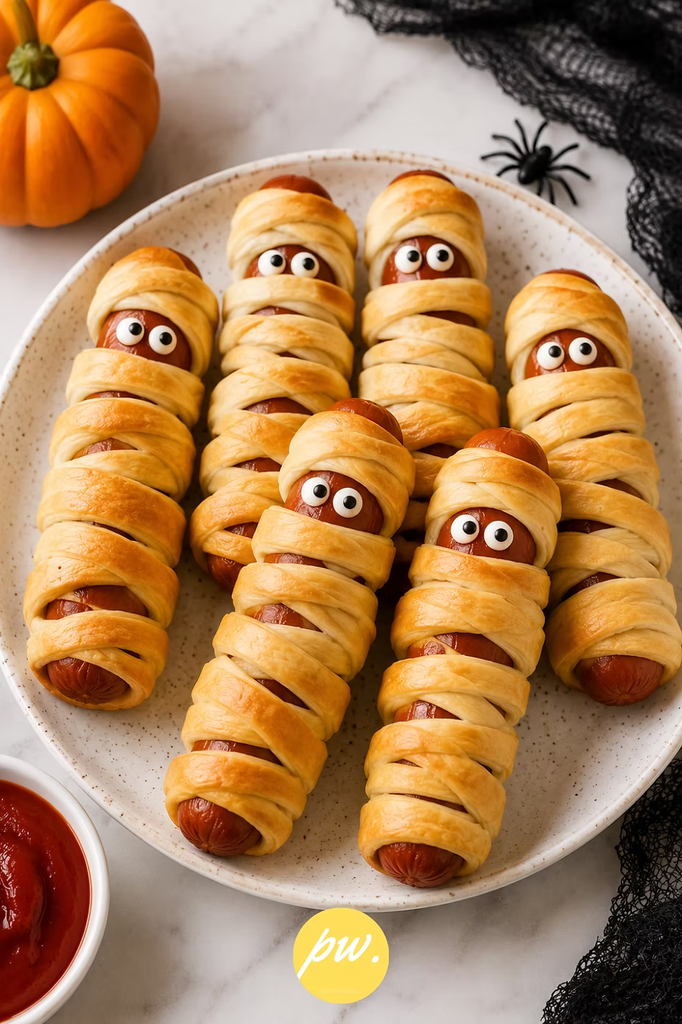
Ingredients
- 8 hot dogs
- 1 can refrigerated crescent roll dough or puff pastry
- 16 edible candy eyes (or small dots of mustard after baking)
- 1 egg, beaten (for egg wash, optional)
Directions
- Preheat your oven according to the crescent roll or puff pastry package directions.
- Unroll the dough onto a lightly floured surface.
- Using a pizza cutter or sharp knife, cut the dough into thin strips about ¼ inch wide.
- Pat the hot dogs dry with a paper towel.
- Wrap each hot dog with the dough strips, leaving a small gap near the top for the mummy’s eyes. Slightly overlap the strips to create a wrapped bandage look.
- Place the wrapped hot dogs on a parchment-lined baking sheet.
- Brush lightly with beaten egg if using for a golden finish.
- Bake according to the dough package directions until the pastry is puffed and golden brown.
- Let cool for a few minutes.
- Attach two candy eyes using a tiny dab of mustard or ketchup, or simply pipe two small dots of mustard to create eyes.Optional Variations
- Mini Mummy Dogs: Use cocktail sausages for bite-sized party snacks.
- Cheesy Mummies: Wrap a thin strip of cheddar cheese with the hot dog before adding the dough.
- Spicy Version: Use jalapeño cheddar sausages.
- Air Fryer Version: Cook according to your air fryer’s pastry setting until golden and crisp.
4.Spider Crackers with Peanut Butter
These adorable Spider Crackers are a fun no-bake Halloween snack that’s perfect for school parties, lunch boxes, or spooky celebrations. Made with buttery crackers, creamy peanut butter, chocolate candies, and pretzel legs, these bite-sized treats come together in just a few simple steps.
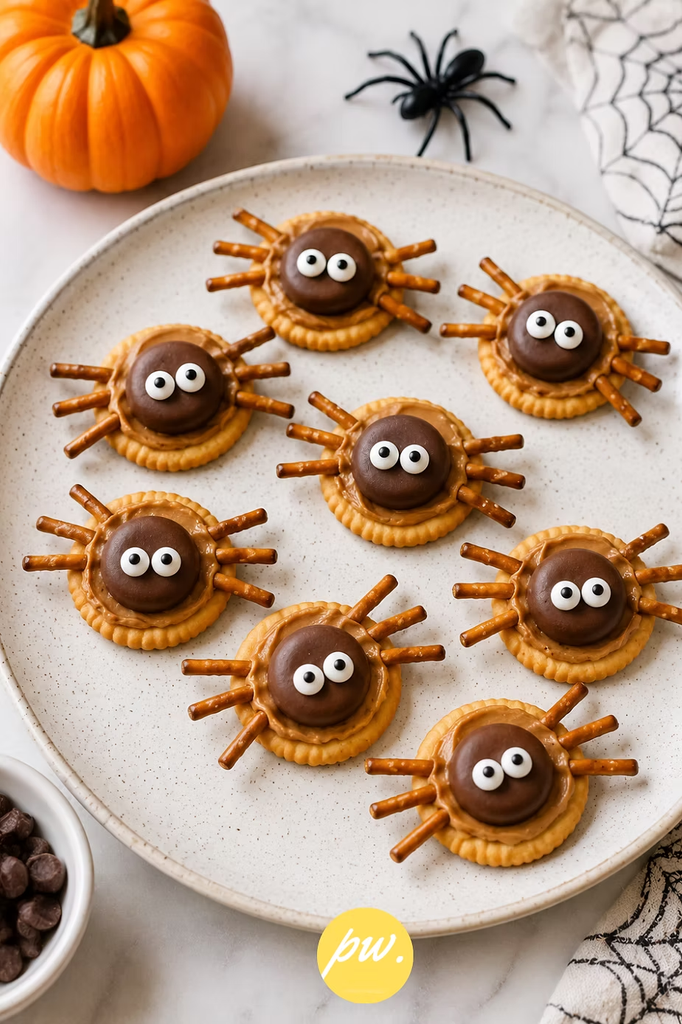
Ingredients
- 16 round buttery crackers (such as Ritz)
- ½ cup creamy peanut butter
- 8 chocolate candy pieces (such as peanut butter cups or chocolate meltaways)
- 16 edible candy eyes
- 32 mini pretzel sticks, broken in half to make 64 spider legs
💡 Helpful Kitchen Tool
A small offset spatula makes spreading the peanut butter evenly on the crackers quick and mess-free.
Directions
- Spread a layer of creamy peanut butter onto 8 crackers.
- Break the mini pretzel sticks in half to create the spider legs.
- Press four pretzel pieces into each side of the peanut butter-covered cracker.
- Place another cracker on top and gently press to secure the legs.
⭐ Make It Easier
Store-bought edible candy eyes instantly bring these little spiders to life and are perfect for all kinds of Halloween treats.
- Add a small dollop of peanut butter to the center of each cracker sandwich.
- Place a chocolate candy on top to create the spider’s body.
- Attach two candy eyes using a tiny dab of peanut butter.
- Arrange on a serving platter and enjoy.
🎃 Fun Serving Idea
Serve these spider crackers on a Halloween-themed platter with popcorn, pretzels, candy corn, and fresh fruit for an easy spooky snack board.
Tips
- Creamy peanut butter works best for holding the pretzel legs in place.
- Assemble the spiders shortly before serving so the crackers stay crisp.
- If serving at school, substitute sunflower seed butter or cookie butter for a nut-free option.
- Gently press the pretzel legs into the peanut butter to prevent them from falling out.
Variations
- Oreo Spiders: Replace the crackers with Oreo cookies for a sweeter version.
- Chocolate Cracker Spiders: Use chocolate sandwich crackers for an extra chocolaty treat.
- Mini Spiders: Use mini crackers and chocolate candies for bite-sized party snacks.
- Nut-Free Version: Swap peanut butter for sunflower seed butter or cream cheese.
5.Witch Broom Cheese Sticks
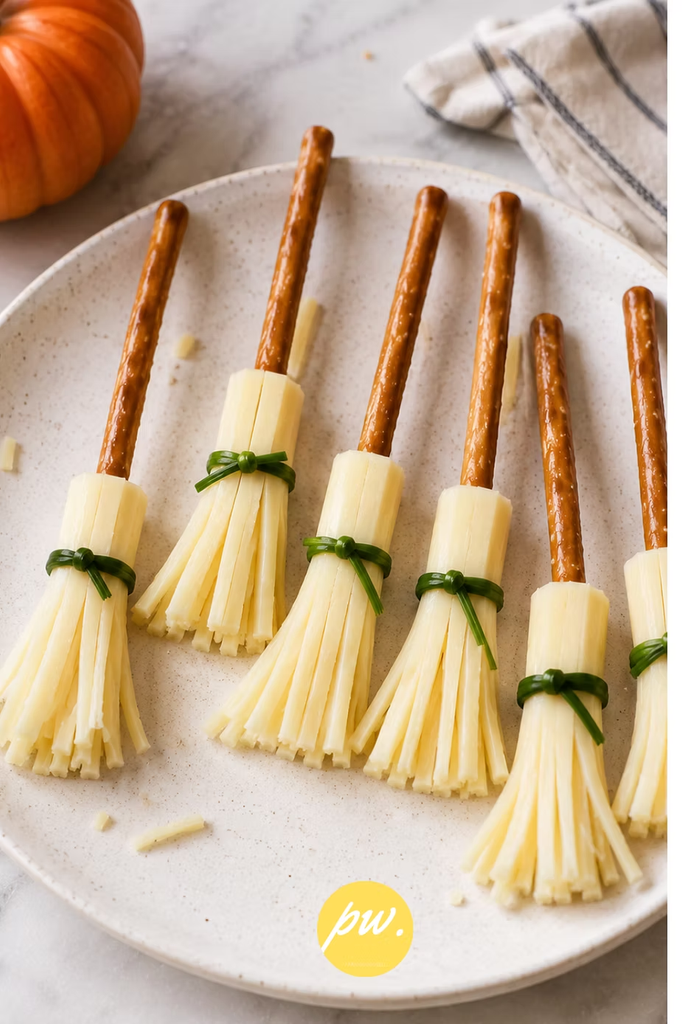
These adorable Witch Broom Cheese Sticks are one of the easiest Halloween snacks you can make. With just string cheese, pretzel sticks, and fresh chives, they come together in minutes and make the perfect addition to Halloween lunch boxes, party platters, or spooky snack boards.
Ingredients
- 8 mozzarella string cheese sticks
- 8 pretzel sticks
- 8 fresh chives
💡 Helpful Kitchen Tool
A small paring knife makes it easy to create thin, even “broom bristles” without cutting all the way through the cheese.
Directions
- Unwrap each mozzarella string cheese stick.
- Using a small knife, cut thin strips into one end of each cheese stick, stopping about 1 inch from the top so the cheese stays intact.
- Gently separate the cut strips with your fingers to create the broom bristles.
- Insert a pretzel stick into the uncut end of each cheese stick to form the broom handle.
⭐ Make It Easier
Kitchen shears work great for quickly cutting the cheese into even broom bristles.
- Tie a fresh chive around the top of the cheese where it meets the pretzel stick. Secure it with a simple knot to resemble a broom binding.
- Arrange the witch brooms on a serving plate or add them to Halloween lunch boxes for a fun surprise.
🎃 Fun Serving Idea
Pair the witch brooms with ghost bananas, pumpkin cheese bites, mummy hot dogs, and fresh fruit to create an easy Halloween snack board.
Tips
- Use full-fat mozzarella string cheese for the best texture.
- Chill the cheese before cutting to help keep the strips neat.
- If the chives feel stiff, dip them in warm water for a few seconds to make them easier to tie.
- Assemble just before serving for the freshest appearance.
Variations
- Cheddar Brooms: Substitute cheddar cheese sticks for a richer flavor.
- Mini Brooms: Cut the cheese sticks in half to make bite-sized party snacks.
- Herb Brooms: Use green onion tops instead of chives for a larger decorative tie.
- Lunchbox Version: Pair each broom with grapes, apple slices, and whole-grain crackers for a fun Halloween lunch.
6.Ghost Pizza Bagels
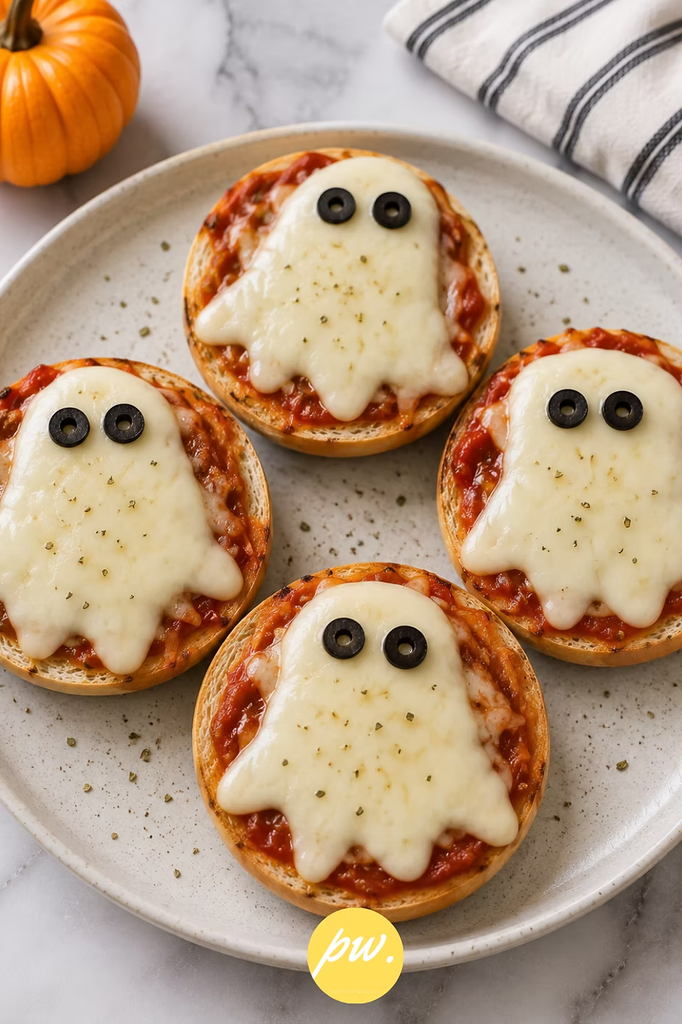
These Ghost Pizza Bagels are a fun and easy Halloween meal that’s perfect for lunch, dinner, or party appetizers. Crispy mini bagels are topped with pizza sauce, gooey mozzarella ghost shapes, and olive eyes to create a spooky treat kids will love.
Ingredients
- 4 mini plain bagels, sliced in half
- ½ cup pizza sauce
- 8 slices mozzarella cheese
- 8 sliced black olives
- 1 teaspoon Italian seasoning (optional)
💡 Helpful Kitchen Tool
A mini ghost cookie cutter makes perfectly shaped mozzarella ghosts in seconds.
Directions
- Preheat your oven according to the mini bagel package directions.
- Arrange the bagel halves on a baking sheet lined with parchment paper.
- Spread each bagel half with pizza sauce.
- Using a ghost-shaped cookie cutter (or a small knife), cut ghost shapes from the mozzarella cheese slices.
⭐ Make It Easier
Mini ghost cookie cutters aren’t just for cookies—they make perfectly shaped cheese toppers for pizzas, sandwiches, and Halloween lunch boxes.
- Place one mozzarella ghost on top of each bagel.
- Add two sliced black olives near the top of each ghost to create the eyes.
- Sprinkle lightly with Italian seasoning, if desired.
- Bake until the cheese is melted and bubbly and the bagels are lightly toasted.
- Let cool slightly before serving.
🎃 Fun Serving Idea
Serve these Ghost Pizza Bagels with carrot sticks, cucumber slices, grapes, or apple wedges for a festive Halloween meal kids will love.
Tips
- Use whole milk mozzarella slices for the smoothest ghost shapes.
- Toast the bagels for a few minutes before adding toppings if you prefer a crispier crust.
- Pat the mozzarella dry with a paper towel before cutting to help the ghost shapes hold their edges.
- Let the pizzas cool for a minute or two before serving so the cheese sets slightly.
Variations
- Pepperoni Ghost Pizza Bagels: Add mini pepperoni slices underneath the mozzarella ghost.
- Veggie Ghosts: Top with diced bell peppers, mushrooms, or spinach before adding the cheese.
- English Muffin Ghost Pizzas: Swap the mini bagels for English muffins.
- Mini Pizza Toasts: Use thick slices of French bread or Texas toast instead of bagels.
7.Monster Rice Krispie Treats
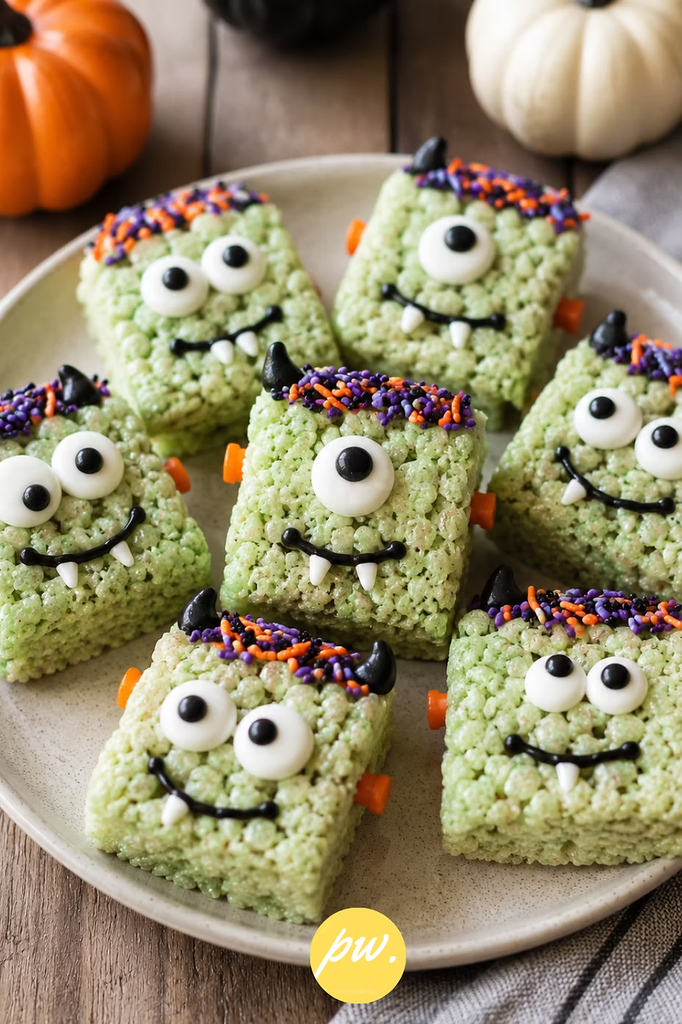
These Monster Rice Krispie Treats are a fun, colorful Halloween dessert that’s perfect for parties, school celebrations, or spooky movie nights. Soft and chewy marshmallow cereal treats are tinted green and decorated with candy eyes, sprinkles, and silly monster faces for an easy no-bake treat everyone will love.
Ingredients
- 6 cups Rice Krispies cereal
- 4 tablespoons unsalted butter
- 10 oz mini marshmallows
- Green gel food coloring
- 24 edible candy eyes
- Black decorating icing
- Halloween sprinkles (purple, orange, and black)
- Candy fangs or white candy melts (optional)
💡 Helpful Kitchen Tool
An 8×8-inch nonstick baking pan helps create perfectly thick Rice Krispie treats that are easy to cut into monster-sized squares.
Directions
- Lightly grease an 8×8-inch baking pan or line it with parchment paper.
- In a large saucepan, melt the butter over low heat.
- Add the mini marshmallows and stir until completely melted and smooth.
- Mix in a few drops of green gel food coloring until you reach your desired monster shade.
⭐ Make It Easier
A silicone spatula makes mixing sticky marshmallows much easier and helps prevent waste.
- Remove from the heat and gently stir in the Rice Krispies cereal until evenly coated.
- Transfer the mixture to the prepared pan and gently press it into an even layer. Avoid pressing too firmly to keep the treats soft and chewy.
- Let the treats cool completely.
- Cut into 9 or 12 squares, depending on your preferred size.
- Decorate each square with candy eyes.
- Pipe funny monster smiles using black decorating icing.
- Add candy fangs or small pieces of white candy melts for monster teeth, if desired.
- Finish with Halloween sprinkles across the top to create colorful monster hair.
🎃 Fun Serving Idea
Arrange the monster treats on a Halloween dessert tray with Ghost Strawberry Bites, Ghost Banana Pops, Spider Crackers, and Mummy Hot Dogs for a festive party spread.
Tips
- Use gel food coloring instead of liquid for vibrant color without making the mixture sticky.
- Butter your hands or spatula before pressing the mixture into the pan.
- Decorate after cutting so each monster has its own unique face.
- Store in an airtight container to keep them soft and chewy.
Variations
- Purple Monsters: Use purple gel food coloring instead of green.
- Frankenstein Monsters: Add flat marshmallow hair and rectangular faces.
- One-Eyed Monsters: Use one jumbo candy eye for a fun monster look.
- Chocolate Monsters: Drizzle melted dark chocolate over the finished treats for extra Halloween flair.
8.Ghost Cheese Sandwich
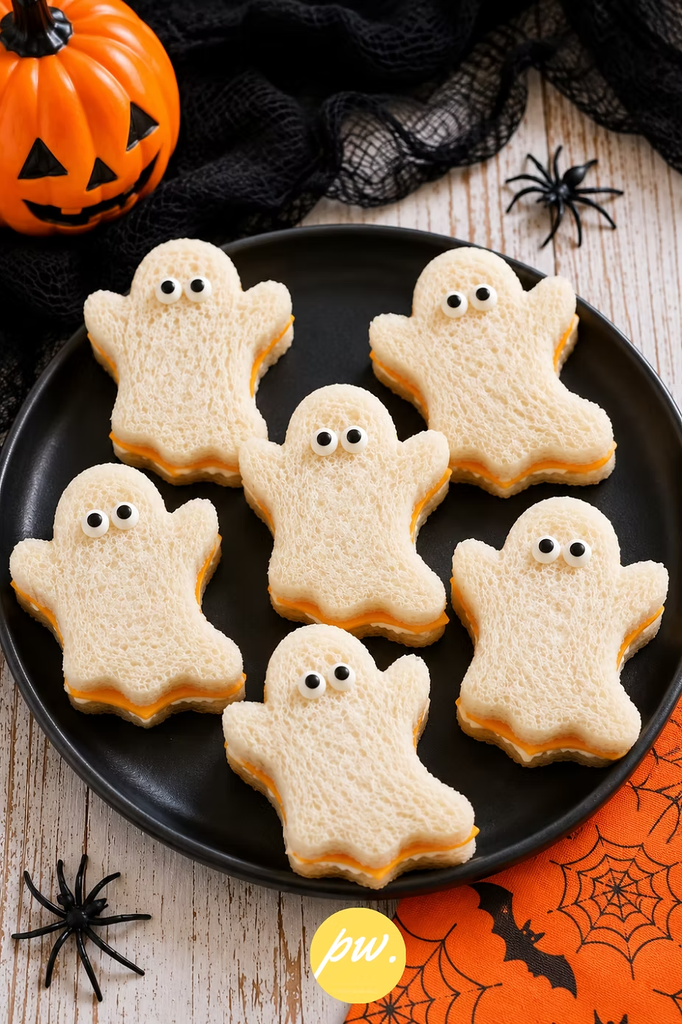
Turn an ordinary cheese sandwich into a spooky Halloween surprise with this adorable Ghost Cheese Sandwich! Made with just a few simple ingredients, it’s a fun and easy lunchbox idea that kids will love during the Halloween season.
Ingredients
- 2 slices sandwich bread
- 1 slice cheddar cheese
- 1 tablespoon cream cheese
- 1 ghost-shaped cookie cutter
- 2 edible candy eyes
💡 Helpful Kitchen Tool
A mini ghost cookie cutter makes it easy to create perfectly shaped Halloween sandwiches, cookies, and cheese slices.
Directions
- Spread the cream cheese evenly over one slice of bread.
- Place the cheddar cheese on top and cover with the second slice of bread.
- Use a ghost-shaped cookie cutter to cut the sandwich into a fun ghost shape.
- Gently press two edible candy eyes onto the cream cheese to create the ghost’s face.
⭐ Make It Even More Fun
Use Halloween-themed bento picks and silicone snack cups to turn an everyday lunch into a festive Halloween meal.
- Pack the ghost sandwich in a bento lunch box with fresh fruit, crackers, and your child’s favorite snacks.
- Serve immediately or keep chilled until lunchtime.
🎃 Lunchbox Idea
Complete the Halloween lunch with blueberries, blackberries, melon stars, mini pretzels, and a small Halloween-themed treat for a colorful and balanced meal.
Tips
- Use soft sandwich bread for clean cookie-cutter shapes.
- Cream cheese works perfectly for attaching the candy eyes.
- Cut leftover cheese into mini ghost or pumpkin shapes to fill empty lunchbox spaces.
- Keep the sandwich chilled with a reusable lunch box ice pack until it’s time to eat.
Variations
- Turkey Ghost Sandwich: Add a slice of turkey with the cheese for extra protein.
- Grilled Ghost Sandwich: Toast the sandwich lightly before cutting into ghost shapes.
- Cream Cheese & Cucumber Ghost: Replace cheddar with cucumber slices for a lighter lunch.
- Mini Ghost Sandwiches: Use small bread rounds to make bite-sized ghost sandwiches for Halloween parties.
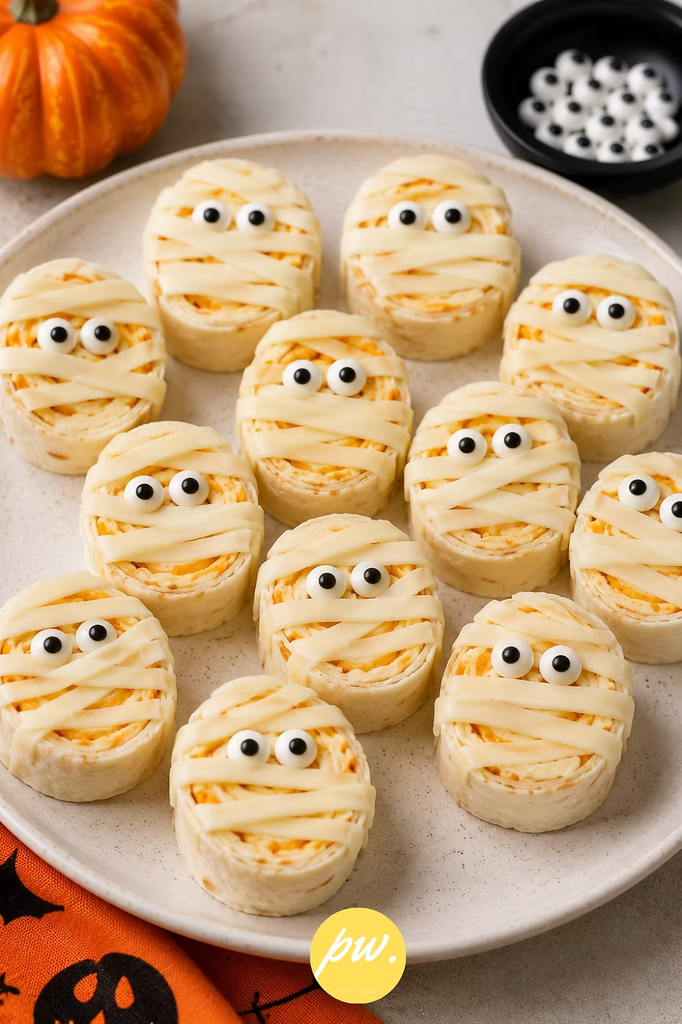
9.Mummy Tortilla Roll-Ups
These adorable Mummy Tortilla Roll-Ups are a fun no-cook Halloween snack that’s perfect for school lunchboxes, Halloween parties, or after-school treats. Soft tortillas are filled with creamy cheese, sliced into bite-sized pinwheels, and decorated with mozzarella “bandages” and candy eyes for an easy spooky snack.
Ingredients
- 2 flour tortillas
- ½ cup cream cheese, softened
- ½ cup shredded cheddar cheese
- 2 mozzarella cheese slices
- 8 edible candy eyes
💡 Helpful Kitchen Tool
A pizza cutter makes it quick and easy to slice the tortilla roll-ups into even, bite-sized pinwheels.
Directions
- Spread an even layer of softened cream cheese over each flour tortilla.
- Sprinkle the shredded cheddar cheese evenly over the cream cheese.
- Roll each tortilla up tightly into a log.
- Slice each roll into 1-inch pinwheels.
⭐ Make It Even More Fun
Use a cheese slicer or kitchen scissors to cut thin strips of mozzarella that look just like mummy bandages.
- Cut the mozzarella slices into thin strips.
- Lay the mozzarella strips across the top of each tortilla pinwheel, leaving a small space for the eyes.
- Press two edible candy eyes onto each mummy using a tiny dab of cream cheese if needed.
- Arrange the mummy roll-ups on a serving platter or pack them into a Halloween-themed bento lunch box.
🎃 Fun Serving Idea
Pair these mummy roll-ups with Ghost Strawberry Bites, Ghost Cheese Sandwiches, blueberries, carrot sticks, and mini pretzels for a festive Halloween lunch or party platter.
Tips
- Chill the rolled tortillas for 15–20 minutes before slicing for cleaner pinwheels.
- Use softened cream cheese so it spreads easily without tearing the tortillas.
- Add the mozzarella strips just before serving so they stay fresh.
- Secure the candy eyes with a tiny dot of cream cheese if they don’t stick naturally.
Variations
- Turkey Mummy Roll-Ups: Add thin slices of deli turkey before rolling.
- Ham & Cheese Mummies: Use sliced ham instead of extra cheddar for added protein.
- Veggie Mummies: Add shredded carrots or baby spinach for extra color and crunch.
- Spicy Mummies: Mix taco seasoning or ranch seasoning into the cream cheese for extra flavor.
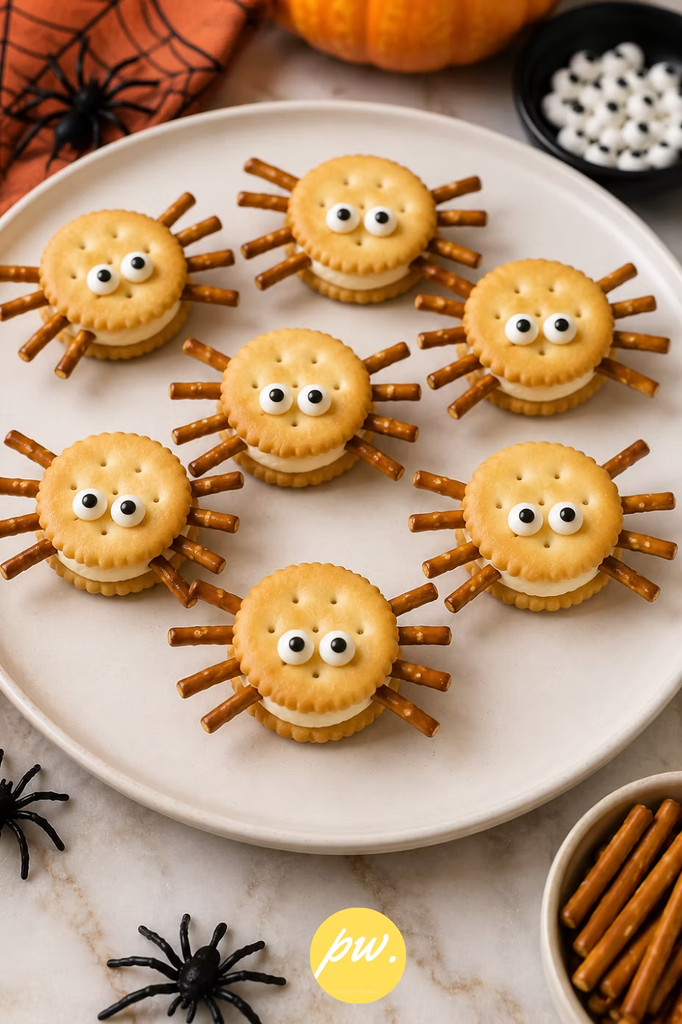
10.Spider Cracker Sandwiches
These Spider Cracker Sandwiches are a quick and fun Halloween snack that’s perfect for school lunchboxes, classroom parties, or spooky snack boards. Creamy cheese-filled crackers with crunchy pretzel legs and candy eyes make these adorable little spiders that kids will love.
Ingredients
- 16 round buttery crackers
- ¼ cup cream cheese, softened
- 32 pretzel stick pieces (4 per spider)
- 16 edible candy eyes
💡 Helpful Kitchen Tool
A reusable piping bag or sandwich bag with the corner snipped off makes it easy to neatly pipe the cream cheese onto each cracker.
Directions
- Spread or pipe a small layer of softened cream cheese onto 8 of the crackers.
- Break the pretzel sticks into equal-sized pieces.
- Place four pretzel pieces on each side of the cream cheese to create eight spider legs.
- Gently place another cracker on top to form a sandwich, pressing lightly to hold the pretzel legs in place.
⭐ Make It Even More Fun
Use a tiny dab of cream cheese to attach the candy eyes so they stay securely in place.
- Attach two edible candy eyes to the top of each cracker sandwich.
- Arrange the spider crackers on a serving plate or pack them carefully into a Halloween lunch box.
🎃 Fun Serving Idea
Serve these spooky spider crackers with Ghost Cheese Sandwiches, Jack-o’-Lantern Orange Cups, Mummy Tortilla Roll-Ups, and Ghost Strawberry Bites for a fun Halloween lunch or party platter.
Tips
- Use sturdy round crackers so they don’t break when assembling.
- Softened cream cheese helps hold the pretzel legs in place.
- Assemble shortly before serving to keep the crackers crisp.
- Store in the refrigerator if making ahead, then bring to room temperature for a few minutes before serving.
Variations
- Peanut Butter Spiders: Replace the cream cheese with peanut butter for a sweet-and-salty version (if allergies aren’t a concern).
- Cheddar Spider Crackers: Use a slice of cheddar cheese instead of cream cheese for extra crunch.
- Googly-Eyed Spiders: Mix different sizes of candy eyes to give each spider a funny personality.
- Mini Spider Platter: Add grapes, blackberries, and pretzel sticks around the spiders for an easy Halloween snack board.
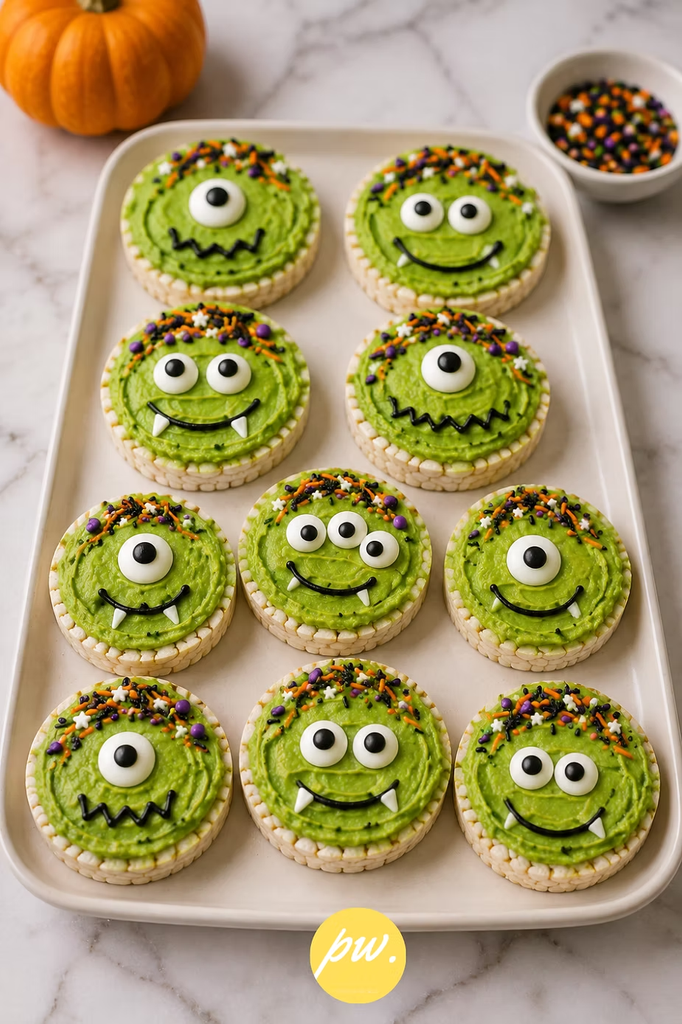
11.Monster Rice Cake
These Monster Rice Cakes are a quick and healthy Halloween snack that’s perfect for school lunchboxes, after-school treats, or classroom parties. Creamy green cream cheese, candy eyes, and colorful sprinkles transform an ordinary rice cake into a silly little monster that kids will love.
Ingredients
- 1 plain rice cake
- 2 tablespoons cream cheese, softened
- 1 drop green gel food coloring
- 2 edible candy eyes
- 1 teaspoon Halloween sprinkles
💡 Helpful Kitchen Tool
Gel food coloring creates vibrant monster colors without making the cream cheese runny.
Directions
- In a small bowl, stir the cream cheese and green gel food coloring together until smooth and evenly colored.
- Spread the green cream cheese over the entire surface of the rice cake.
- Place two edible candy eyes near the top to create your monster’s face.
- Sprinkle Halloween sprinkles over the cream cheese for colorful monster “hair” and texture.
⭐ Make It Even More Fun
Add a pretzel stick, mini marshmallows, or candy corn to create funny monster horns, teeth, or ears.
- Serve immediately, or pack carefully in a lunchbox using a shallow container to keep the decorations in place.
🎃 Fun Serving Idea
Pair your Monster Rice Cake with Jack-o’-Lantern Orange Cups, Ghost Cheese Sandwiches, Strawberry Ghosts, and Mummy Tortilla Roll-Ups for a spooky Halloween lunch kids will be excited to open.
Tips
- Use gel food coloring for bright color with just one drop.
- Soften the cream cheese before mixing for a smooth, even spread.
- Add the candy eyes after spreading the cream cheese so they stick easily.
- Decorate just before packing to keep the sprinkles looking fresh.
Variations
- Purple Monster: Use purple gel food coloring instead of green.
- Furry Monster: Sprinkle shredded coconut dyed green over the cream cheese.
- Googly Monster: Use different-sized candy eyes for a funny monster face.
- Healthy Monster: Top with sliced kiwi or green grapes instead of sprinkles for a naturally colorful snack.
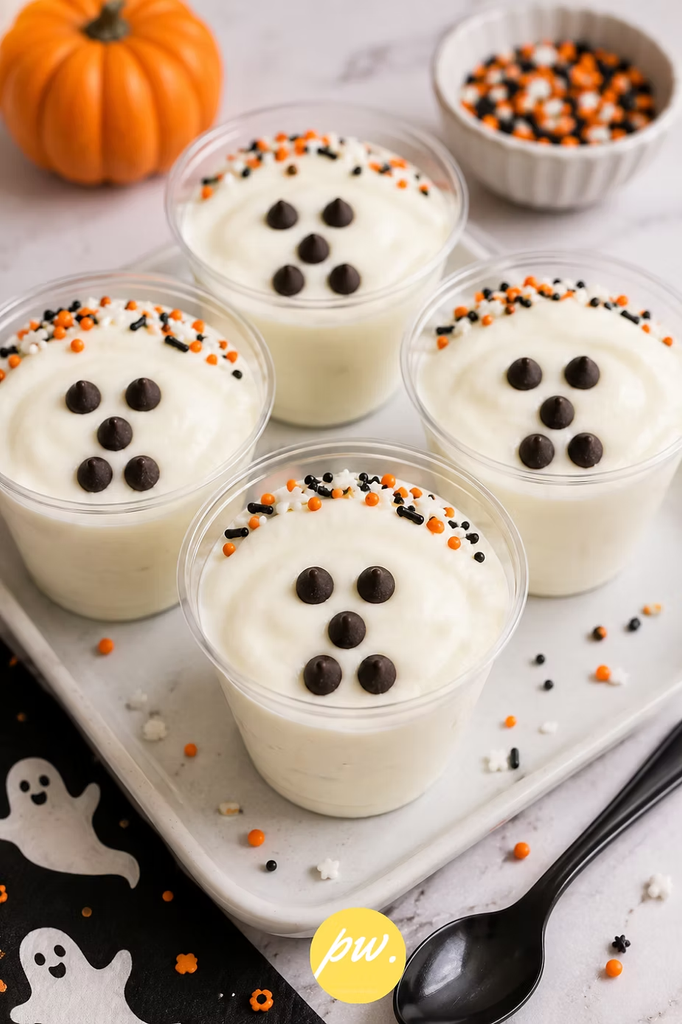
12.Ghost Yogurt Cups
These adorable Ghost Yogurt Cups are a healthy, no-cook Halloween snack that’s perfect for school lunches, classroom parties, or an easy after-school treat. Creamy vanilla yogurt is topped with a cute ghost face made from chocolate chips for a spooky snack kids will love.
Ingredients
- 4 single-serve vanilla yogurt cups (or 2 cups vanilla Greek yogurt)
- 24 mini chocolate chips (for the eyes and mouth)
- Halloween sprinkles (optional)
💡 Helpful Kitchen Tool
Clear reusable dessert cups make these ghost treats perfect for Halloween parties and lunchboxes.
Directions
- Spoon the vanilla yogurt into clear dessert cups if you’re not using individual yogurt cups.
- Smooth the top of each yogurt cup with the back of a spoon.
- Arrange two mini chocolate chips for the ghost’s eyes.
- Add three chocolate chips below the eyes to create a spooky ghost mouth.
⭐ Make It Even More Fun
Top each yogurt cup with a pinch of Halloween sprinkles or serve with a Halloween-themed spoon.
- Refrigerate until ready to serve.
- Pack into lunchboxes with an ice pack or serve chilled at your Halloween party.
🎃 Fun Serving Idea
Pair Ghost Yogurt Cups with Ghost Cheese Sandwiches, Jack-o’-Lantern Orange Cups, Strawberry Ghosts, and Monster Rice Cakes for a healthy Halloween lunch or snack board.
Tips
- Use Greek yogurt for a thicker, creamier texture.
- Mini chocolate chips stay in place better than regular-sized chips.
- Assemble just before serving for the freshest look.
- Keep chilled with a reusable lunch box ice pack if packing for school.
Variations
- Berry Ghost Yogurt: Add fresh blueberries or sliced strawberries at the bottom of the cup.
- Pumpkin Yogurt Cups: Stir a spoonful of pumpkin puree and pumpkin pie spice into vanilla yogurt.
- Cookies & Cream Ghosts: Sprinkle crushed chocolate sandwich cookies over the top before adding the ghost face.
- Parfait Ghost Cups: Layer yogurt with granola and fruit for a fun Halloween breakfast.
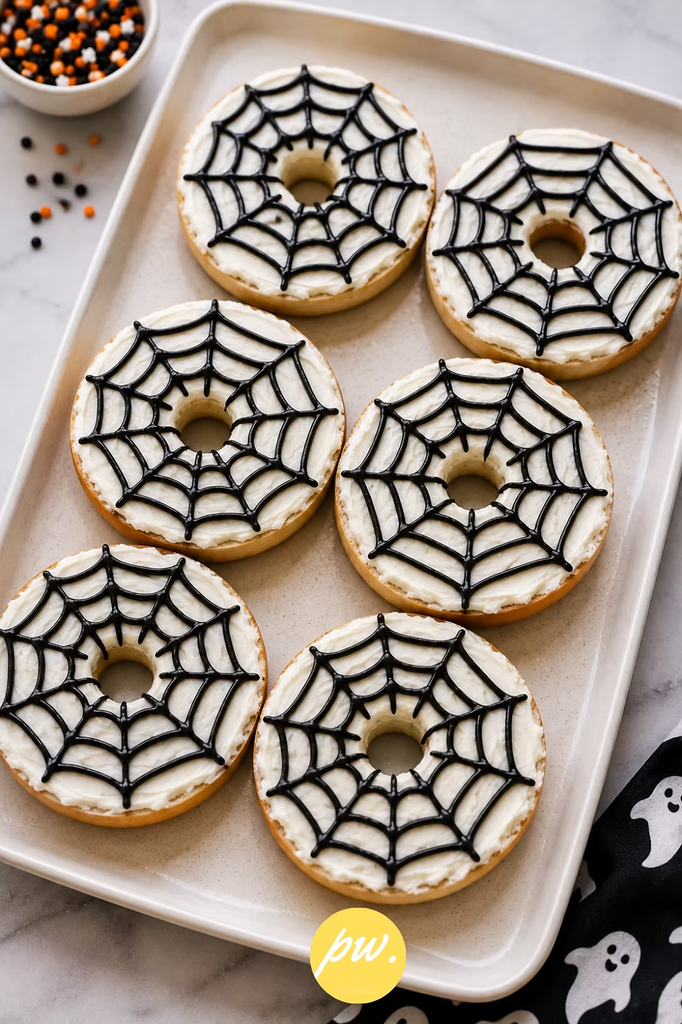
13.Spiderweb Cream Cheese Bagel
This Spiderweb Cream Cheese Bagel is a fun and easy Halloween breakfast or lunch that’s ready in minutes. A toasted bagel topped with creamy cheese and decorated with a spooky black icing spiderweb makes a festive treat that’s perfect for school mornings, Halloween parties, or October brunches.
Ingredients
- 1 plain bagel, sliced and toasted
- 3 tablespoons cream cheese, softened
- 1 tube black decorating icing gel
- 1 candy spider or plastic spider ring (optional, for decoration)
💡 Helpful Kitchen Tool
A decorating icing gel with a fine writing tip makes it easy to pipe neat spiderweb designs.
Directions
- Toast the bagel halves until lightly golden and allow them to cool slightly.
- Spread an even layer of softened cream cheese over each bagel half.
- Using the black decorating icing gel, pipe a small circle in the center of the bagel.
- Pipe three or four larger circles around the center, spacing them evenly to create the base of the spiderweb.
⭐ Make It Even More Fun
Use edible candy spiders or a plastic spider ring to decorate the center of the web for an extra spooky Halloween touch.
- Using a toothpick, gently drag straight lines from the center outward through all the circles to create a realistic spiderweb pattern.
- Place a candy spider in the center of the web, if desired.
- Serve immediately while the bagel is still fresh.
🎃 Fun Serving Idea
Serve your Spiderweb Cream Cheese Bagel with Ghost Yogurt Cups, Jack-o’-Lantern Orange Cups, Monster Rice Cakes, and Strawberry Ghosts for a fun Halloween breakfast or lunch spread.
Tips
- Let the bagel cool slightly before spreading the cream cheese so it stays thick and smooth.
- Use decorating icing gel with a fine tip for crisp, detailed spiderweb lines.
- Draw the web slowly for clean, even circles.
- Add the spider decoration just before serving for the best presentation.
Variations
- Chocolate Spiderweb Bagel: Spread chocolate hazelnut spread instead of cream cheese and use white decorating icing for the web.
- Mini Spiderweb Bagels: Use mini bagels for Halloween party appetizers or kids’ lunchboxes.
- Colorful Web: Use orange or purple decorating icing for a fun Halloween twist.
- Spooky Sprinkle Bagel: Finish with Halloween sprinkles around the edge for extra festive color.
🎃 Halloween Kitchen & Party Essentials
Planning a Halloween party or packing spooky lunchbox treats? These festive kitchen tools and party supplies make decorating, serving, and packaging your Halloween snacks easy and fun.
👻 Decorating Supplies
- Candy Eyes
- Halloween Food Picks
- Halloween Sprinkles
🍽️ Serveware
- Coffin Paper Trays
- Halloween Serving Platters
- Mini Dip Bowls
🎁 Packaging
- Halloween Cellophane Treat Bags
- Halloween Food Wrap Paper
- Halloween Stickers
👩🍳 Kitchen Tools
- Silicone Baking Mat
- Pizza Cutter
- Cheese Grater
🎃 Final Thoughts
From spooky snacks to festive lunchbox treats, these easy Halloween recipes make celebrating the season simple and fun. We hope you found a few new favorites to try!
Save this post to Pinterest so you can easily find these Halloween snack ideas whenever you need them. Happy Halloween! 🎃👻